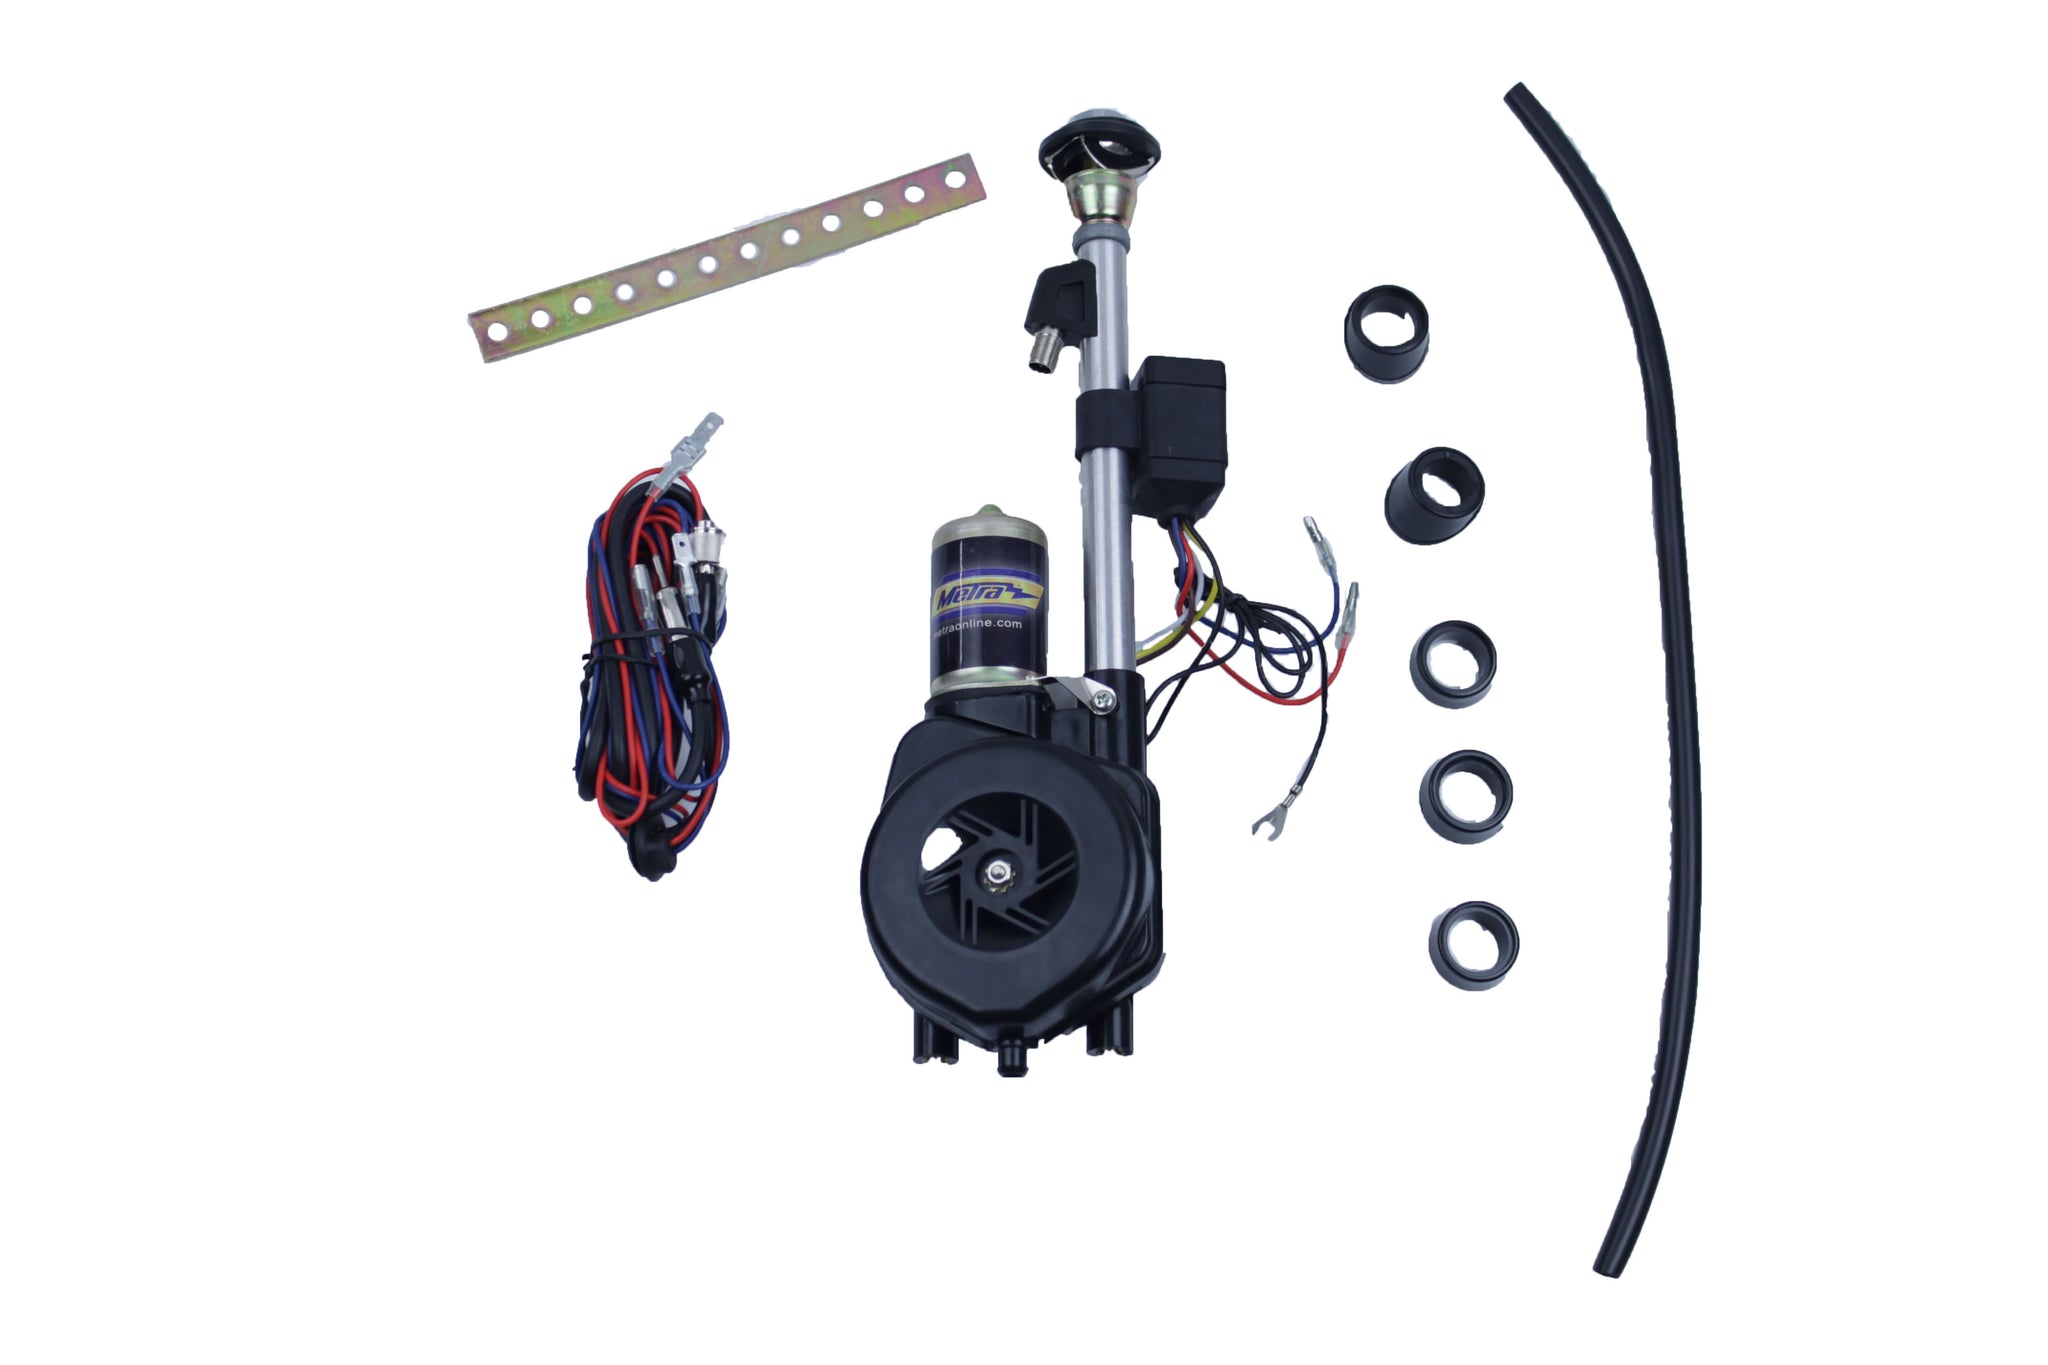
NEW ANTENNA INSTALLATION: For first time antenna installations: A) Use original factory hole or select a location on the front or back fender of car for mounting antenna. In selecting the location, make sure the underside of the fender is free of any obstruction such as weld beads, braces, gussets and sub-fender.Also, be sure that sufficient clearance is available under fender to house the antenna, approximately 11-1/2” / 29cm. B) Six mounting bases are provided with the antenna. Five fixed angle and one adjustable angle flush mount base. C) Remove the installed flush mounting base from new antenna. Select the proper base with correct angle for fender. NOTE: The five fixed angle bases require a 7/8” / 22mm hole. The adjustable angle flush base requires a 1” 25mm hole. D) If factory location is not used, a 1/8” / 3mm pilot hole should be drilled, then enlarged with a hole saw or drill bit to the proper size. E) Remove all burrs, paint, road dirt or undercoating from around the underside of the hole. F) Install the antenna from the underside of the fender and assemble the base above the fender according to Figure 1. BE SURE THE RETAINER RESTS EVENLY ON THE UNDERSIDE OF THE FENDER TO ALLEVIATE ANY POSSIBLE DAMAGE TO THE VEHICLE. Align the mast vertically by slightly tightening the antenna mounting nut while adjusting the mast to be vertical. G) To prevent movement and maintain the desired angle, secure the bottom of the motor assembly with the supplied perforated strap. Holes are provided with the strap to accommodate various mounting positions. It may be necessary to bend the strap to conform to the fit of the antenna and car. Be sure the antenna retainer is grounded to the underside of the fender and the black ground wire is grounded properly to the vehicle chassis. If the retainer and ground wire are not properly grounded, THE ANTENNA WILL NOT FUNCTION. H) With the bottom of the antenna motor assembly secured, the mast at the desired angle and the retainer resting evenly on the underside of the fender, tighten the mounting nut firmly to secure the entire antenna assembly. Do not tighten the nut excessively as this may strip or break the mounting threads or damage contact spring and cause improper antenna operation. I) Attach the drain lube to the bottom of the motor assembly and route to the outside of the car. Avoid any kinks or bends in the tube that may restrict drainage. J) Route electrical wiring and coaxial cable into the dash area of the vehicle interior. If possible, avoid routing coaxial cable into engine compartment. The electrical noise found in this area may be transmitted into the antenna wiring. ANTENNA WIRING A) Radios with switched antenna wire (aftermarket): Connect blue wire from antenna to the switched antenna wire from radio (normally blue). Connect coaxial cable from antenna to radio. B) The red power wire from antenna can be connected at fuse block. Battery, or hot side of ignition switch or any other +12 volt “constant on” location. C) If you are replacing a factory FJ62 or 80 Series electric antenna, this antenna is wired differently from the stock, so it will not work with the original switch. Basically, when the blue wire is energized, the antenna goes up, and when the circuit is broken, it goes down. With the OEM switch, you could make the antenna go up, but as soon as you release the switch, the antenna would go back down. You can wire the blue wire to a key-on ignition source, so that the antenna goes up when the key is turned on, and down when it is turned off. Another option is to install a 2 position toggle switch inline with the blue wire, to a key-on +12V source. That way, in one position, the antenna goes up, flip the switch, and it goes down, but only while the key is turned on. If you leave the switch turned "on" and turn off the key, the antenna will retract. This is usually the best wiring option for Land Cruisers, because it gives the ability to retract the antenna while off road, at the car wash, or anywhere else the antenna may face damage.
Details
NEW ANTENNA INSTALLATION: For first time antenna installations: A) Use original factory hole or select a location on the front or back fender of car for mounting antenna. In selecting the location, make sure the underside of the fender is free of any obstruction such as weld beads, braces, gussets and sub-fender.Also, be sure that sufficient clearance is available under fender to house the antenna, approximately 11-1/2” / 29cm. B) Six mounting bases are provided with the antenna. Five fixed angle and one adjustable angle flush mount base. C) Remove the installed flush mounting base from new antenna. Select the proper base with correct angle for fender. NOTE: The five fixed angle bases require a 7/8” / 22mm hole. The adjustable angle flush base requires a 1” 25mm hole. D) If factory location is not used, a 1/8” / 3mm pilot hole should be drilled, then enlarged with a hole saw or drill bit to the proper size. E) Remove all burrs, paint, road dirt or undercoating from around the underside of the hole. F) Install the antenna from the underside of the fender and assemble the base above the fender according to Figure 1. BE SURE THE RETAINER RESTS EVENLY ON THE UNDERSIDE OF THE FENDER TO ALLEVIATE ANY POSSIBLE DAMAGE TO THE VEHICLE. Align the mast vertically by slightly tightening the antenna mounting nut while adjusting the mast to be vertical. G) To prevent movement and maintain the desired angle, secure the bottom of the motor assembly with the supplied perforated strap. Holes are provided with the strap to accommodate various mounting positions. It may be necessary to bend the strap to conform to the fit of the antenna and car. Be sure the antenna retainer is grounded to the underside of the fender and the black ground wire is grounded properly to the vehicle chassis. If the retainer and ground wire are not properly grounded, THE ANTENNA WILL NOT FUNCTION. H) With the bottom of the antenna motor assembly secured, the mast at the desired angle and the retainer resting evenly on the underside of the fender, tighten the mounting nut firmly to secure the entire antenna assembly. Do not tighten the nut excessively as this may strip or break the mounting threads or damage contact spring and cause improper antenna operation. I) Attach the drain lube to the bottom of the motor assembly and route to the outside of the car. Avoid any kinks or bends in the tube that may restrict drainage. J) Route electrical wiring and coaxial cable into the dash area of the vehicle interior. If possible, avoid routing coaxial cable into engine compartment. The electrical noise found in this area may be transmitted into the antenna wiring. ANTENNA WIRING A) Radios with switched antenna wire (aftermarket): Connect blue wire from antenna to the switched antenna wire from radio (normally blue). Connect coaxial cable from antenna to radio. B) The red power wire from antenna can be connected at fuse block. Battery, or hot side of ignition switch or any other +12 volt “constant on” location. C) If you are replacing a factory FJ62 or 80 Series electric antenna, this antenna is wired differently from the stock, so it will not work with the original switch. Basically, when the blue wire is energized, the antenna goes up, and when the circuit is broken, it goes down. With the OEM switch, you could make the antenna go up, but as soon as you release the switch, the antenna would go back down. You can wire the blue wire to a key-on ignition source, so that the antenna goes up when the key is turned on, and down when it is turned off. Another option is to install a 2 position toggle switch inline with the blue wire, to a key-on +12V source. That way, in one position, the antenna goes up, flip the switch, and it goes down, but only while the key is turned on. If you leave the switch turned "on" and turn off the key, the antenna will retract. This is usually the best wiring option for Land Cruisers, because it gives the ability to retract the antenna while off road, at the car wash, or anywhere else the antenna may face damage.